


Caring for Phalaenopsis Orchids Throughout the Seasons
Taking care of your indoor plants all year round
Contents
Phalaenopsis orchids, often called “butterfly orchids” because of the graceful shape of their flowers, are beloved plants by indoor gardening enthusiasts for many years. Their delicate beauty, long-lasting flowering, and ability to rebloom make them favourites in many households.
Despite their exotic appearance, Phalaenopsis are surprisingly accessible plants, even for novice gardeners. However, for them to thrive and continue flowering year after year, it is essential to understand their specific needs and the adjustments to make throughout the seasons.
In this article, explore how to care for your Phalaenopsis orchid throughout the year. You will discover how to adapt your actions to the plant’s natural cycle, stimulate its flowering, and avoid the most common mistakes!

The basics for properly caring for a Phalaenopsis orchid
Phalaenopsis orchids are among the easiest orchids to grow. But to keep them healthy and blooming regularly, it is essential to understand their specific needs.
Understanding the needs of the Phalaenopsis orchid
Phalaenopsis are epiphytic plants, which means they naturally grow on trees in a tropical environment. They do not live in soil but cling to tree bark, where their roots absorb moisture from the air and nutrients leached by rain. Recreating these conditions at home is key to successful care.
The orchid’s roots are aerial and play an important role in photosynthesis. This is why they need to remain exposed to light and air, without being suffocated by a dense or waterlogged substrate.
Substrate and suitable pot
To mimic its natural habitat, Phalaenopsis should be planted in a light and well-draining substrate, often composed of pine bark, coconut fibers, or sphagnum. This type of substrate allows the roots to breathe while retaining just enough moisture.
The choice of pot is also important. Opt for a transparent pot to allow light to reach the roots, promoting photosynthesis. Perforated pots are essential for good drainage, as Phalaenopsis dislike constantly wet roots.
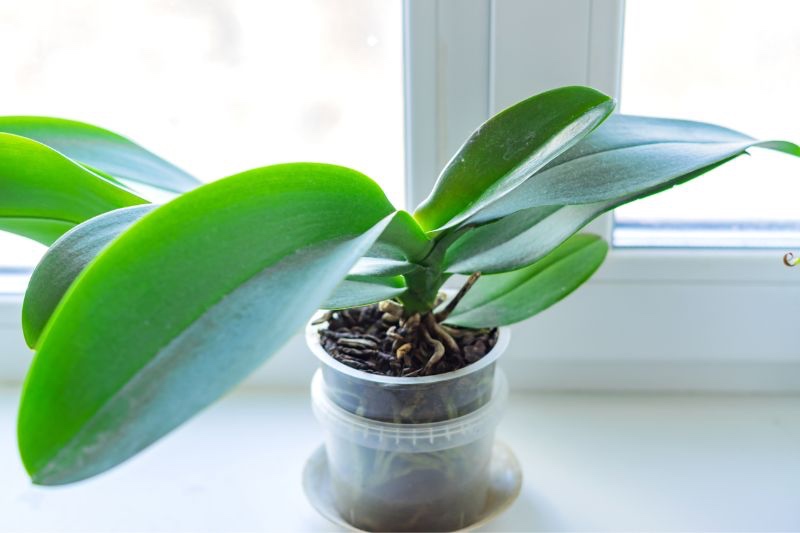
In Phalaenopsis culture basics, choose a transparent pot with a bark substrate
Watering: the key point of care
Watering is one of the most delicate aspects of caring for Phalaenopsis. Too much water can lead to root rot, while too little can cause them to dry out.
A common method is to immerse the pot in a bowl of water for 10 to 15 minutes, then allow it to drain well before putting it back in place. Generally, a weekly watering frequency is sufficient, but it varies depending on the season, temperature, and ambient humidity.
The water used should be at room temperature and low in limestone. If your tap water is too hard, prefer rainwater or filtered water.
Where to place an orchid in the house?
Phalaenopsis appreciate soft, indirect light, such as that from an east or southeast-facing windowsill. Direct light can burn the leaves, while insufficient light hinders flowering.
The ideal temperature for an orchid is between 18 and 25 °C, with a slight difference between day and night. Avoid places exposed to drafts, such as near a frequently opened door or window, as well as areas close to radiators, which dry out the air.
Ambient humidity: a factor often overlooked
In their natural habitat, Phalaenopsis benefit from high humidity. To replicate these conditions indoors, you can lightly mist the aerial roots, especially in summer or in a dry environment. An ideal humidity of 50 to 70% can be complemented by a humidifier if necessary.
Common mistakes to avoid
- Root rot is the most common cause of Phalaenopsis death. Ensure that water never stagnates in the pot or saucer.
- Roots need to breathe. A substrate that is too compact or too old should be replaced regularly.
- Drafts or sudden changes in heat and cold can stress the orchid.
Phalaenopsis Care Season by Season
Caring for Phalaenopsis orchids changes throughout the seasons as their needs evolve with variations in light, temperature, and humidity. Here’s how to adjust your care routine throughout the year to ensure their health and flowering.
Spring: the period of active growth
Spring marks the resurgence of Phalaenopsis activity after the winter rest. It’s an essential period to stimulate growth and prepare for the next flowering.
- Watering: Watering should be increased as the plant uses more water to develop its roots and leaves. In general, water once a week ensuring the substrate dries out between waterings. Avoid letting water stagnate in the pot or saucer to prevent root rot.
- Fertilizer: Apply a special orchid fertilizer every two weeks. Use a nitrogen-rich product to support leaf and root growth. Always dilute the fertilizer in water to avoid root burn.
- Repotting: Spring is the ideal time to repot your orchid if the substrate is compacted or if the roots are overflowing from the pot. Regular repotting every two or three years ensures good drainage and healthier roots.
During this season, place your orchid in a bright location, but away from direct sunlight, to support its growth spurt.
→ Read our tutorial on repotting Phalaenopsis
Summer: heat and intense light
With long days and high temperatures, summer can be a demanding period for your orchid. Properly managed, it will remain healthy despite the heat.
- Light: Place your Phalaenopsis in a very bright location, such as an east or north-facing windowsill, but protect it from direct sunlight with a curtain. Excessive exposure can cause leaf burns, visible as brown spots.
- Watering: Heat accelerates evaporation, so regularly check the substrate. Water once or twice a week depending on the temperature and lightly mist the aerial roots if the air is dry.
- Parasites: The drier conditions of summer can favour certain parasites. Regularly inspect the leaves, especially underneath, to detect any signs of infestation.
During summer, your orchid benefits from conditions similar to its tropical habitat, provided it has access to a not-too-dry environment.
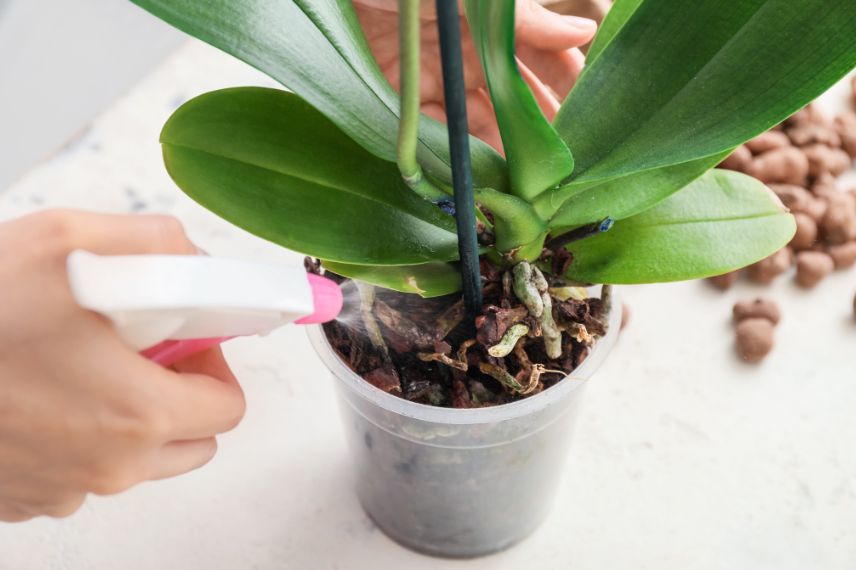
In summer, feel free to mist the aerial roots of Phalaenopsis
Autumn: preparing for flowering
Autumn is often a crucial period for Phalaenopsis as this is when they prepare their flower spikes.
- Watering: Slightly reduce watering frequency, spacing waterings every 10 to 14 days. This decrease simulates the drier conditions of a tropical autumn and encourages flower spike formation.
- Temperature: To stimulate flowering, create a temperature difference between day and night, ideally 5 to 10°C. Place your orchid in a cooler room at night.
- Pruning: If an old flower spike is still green after the flowers have fallen, cut it above a node. This may encourage new flowering. If the spike is dry, trim it at the base to allow the plant to focus its energy on new shoots.
During autumn, pay attention to the emergence of new flower spikes and adjust care to encourage their development.
Winter: rest and patience
In winter, orchid activity slows down, but it’s often the period when flowers begin to bloom if flower spikes formed in autumn.
- Watering: Space out waterings to every two or three weeks as evaporation is lower and the plant consumes less water. Be careful not to overwater as roots could rot in damp substrate.
- Light: Place your orchid near a well-exposed window to compensate for the low winter light. If natural light is insufficient, you can use a grow light as a supplement.
- Protection from the cold: Avoid cold drafts, sudden temperature changes, and locations near radiators, which dry out the air.
Orchids typically bloom in winter, and you can enjoy their flowers for several weeks, even months. Once flowering is over, let it rest before attempting to rebloom.
After the first year of maintenance: how to make a Phalaenopsis orchid flower again?
This is a common question, especially after the plant has lost its magnificent flowers. Contrary to what some may think, once the flowers have fallen, the orchid is not dead: it simply enters a resting period to regenerate before producing new flowers. Here’s how to encourage this process and maximize your chances of seeing your Phalaenopsis in bloom again.
A resting period is necessary after each flowering to allow the plant to replenish its strength. On average, a well-maintained orchid blooms once a year, but some can bloom twice if conditions are ideal.
### What to do after flowering?
When the flowers fall, the first step is to examine the flower spike. Depending on its condition, here are the actions to consider:
– **If the spike is still green:**
You can trim it slightly, just above a node (small swelling along the stem). This may stimulate the production of a new flower branch. However, this method can be taxing for the plant if it has not had enough rest.
– **If the spike is dry and brown:**
Cut it at the base, as it will no longer produce flowers. This pruning allows the orchid to concentrate its energy on its leaves, roots, and preparing a new spike.
In both cases, make sure to use clean and disinfected scissors to avoid introducing diseases.
Apply the advice seen in the previous chapters regarding light, watering, day/night temperature difference, and fertilization to ensure your orchid blooms for many years.
### Patience and observation
Getting a Phalaenopsis orchid to bloom again requires time and attention. A new flower spike can take several weeks to appear, and it takes about three months for the flowers to fully open.
### What if it doesn’t bloom again?
If your orchid shows no sign of flowering after several months:
– Ensure it receives enough light. Too dark foliage may indicate a lack of brightness.
– Try to create a more pronounced day/night temperature difference to stimulate it.
– Check that the substrate is in good condition. If it is compacted or old, repotting may be necessary.

- Subscribe!
- Contents
Feedbacks